






How to Anchor an Indoor Climbing Frame: The Parent’s 2026 Safety Guide
Your child’s indoor gym isn't just a toy; it’s a launchpad for their physical potential, and that launchpad is only as brave as its foundation. If you’ve ever watched your toddler scale a ladder and felt that sharp pang of "what if it tips?", you aren't alone. Learning how to anchor indoor climbing frame setups properly is the crucial difference between a shaky play area and a rock-solid home gym that empowers every jump, swing, and climb. It’s about transforming your living space into a zone of pure, fearless discovery.
We understand the anxiety that comes with drilling into your Canadian drywall or hunting for studs. You want the incredible developmental benefits of active play, but the confusion over heavy-duty hardware can feel overwhelming. This guide delivers professional techniques to secure your equipment to 2026 safety standards, ensuring your installation looks clean and stays permanent. We’ll walk through selecting the right anchors for your specific wall type, understanding dynamic loads, and creating a professional-grade setup that gives you absolute confidence in your child’s safety.
Key Takeaways
- Build a foundation of trust by understanding how secure anchoring turns "risky play" into a safe developmental milestone for your child.
- Learn the technical secrets of how to anchor indoor climbing frame systems into various wall types while respecting weight limits for every component.
- Evaluate the structural benefits of premium metal versus wood and ensure all surfaces use lead-free, non-toxic finishes.
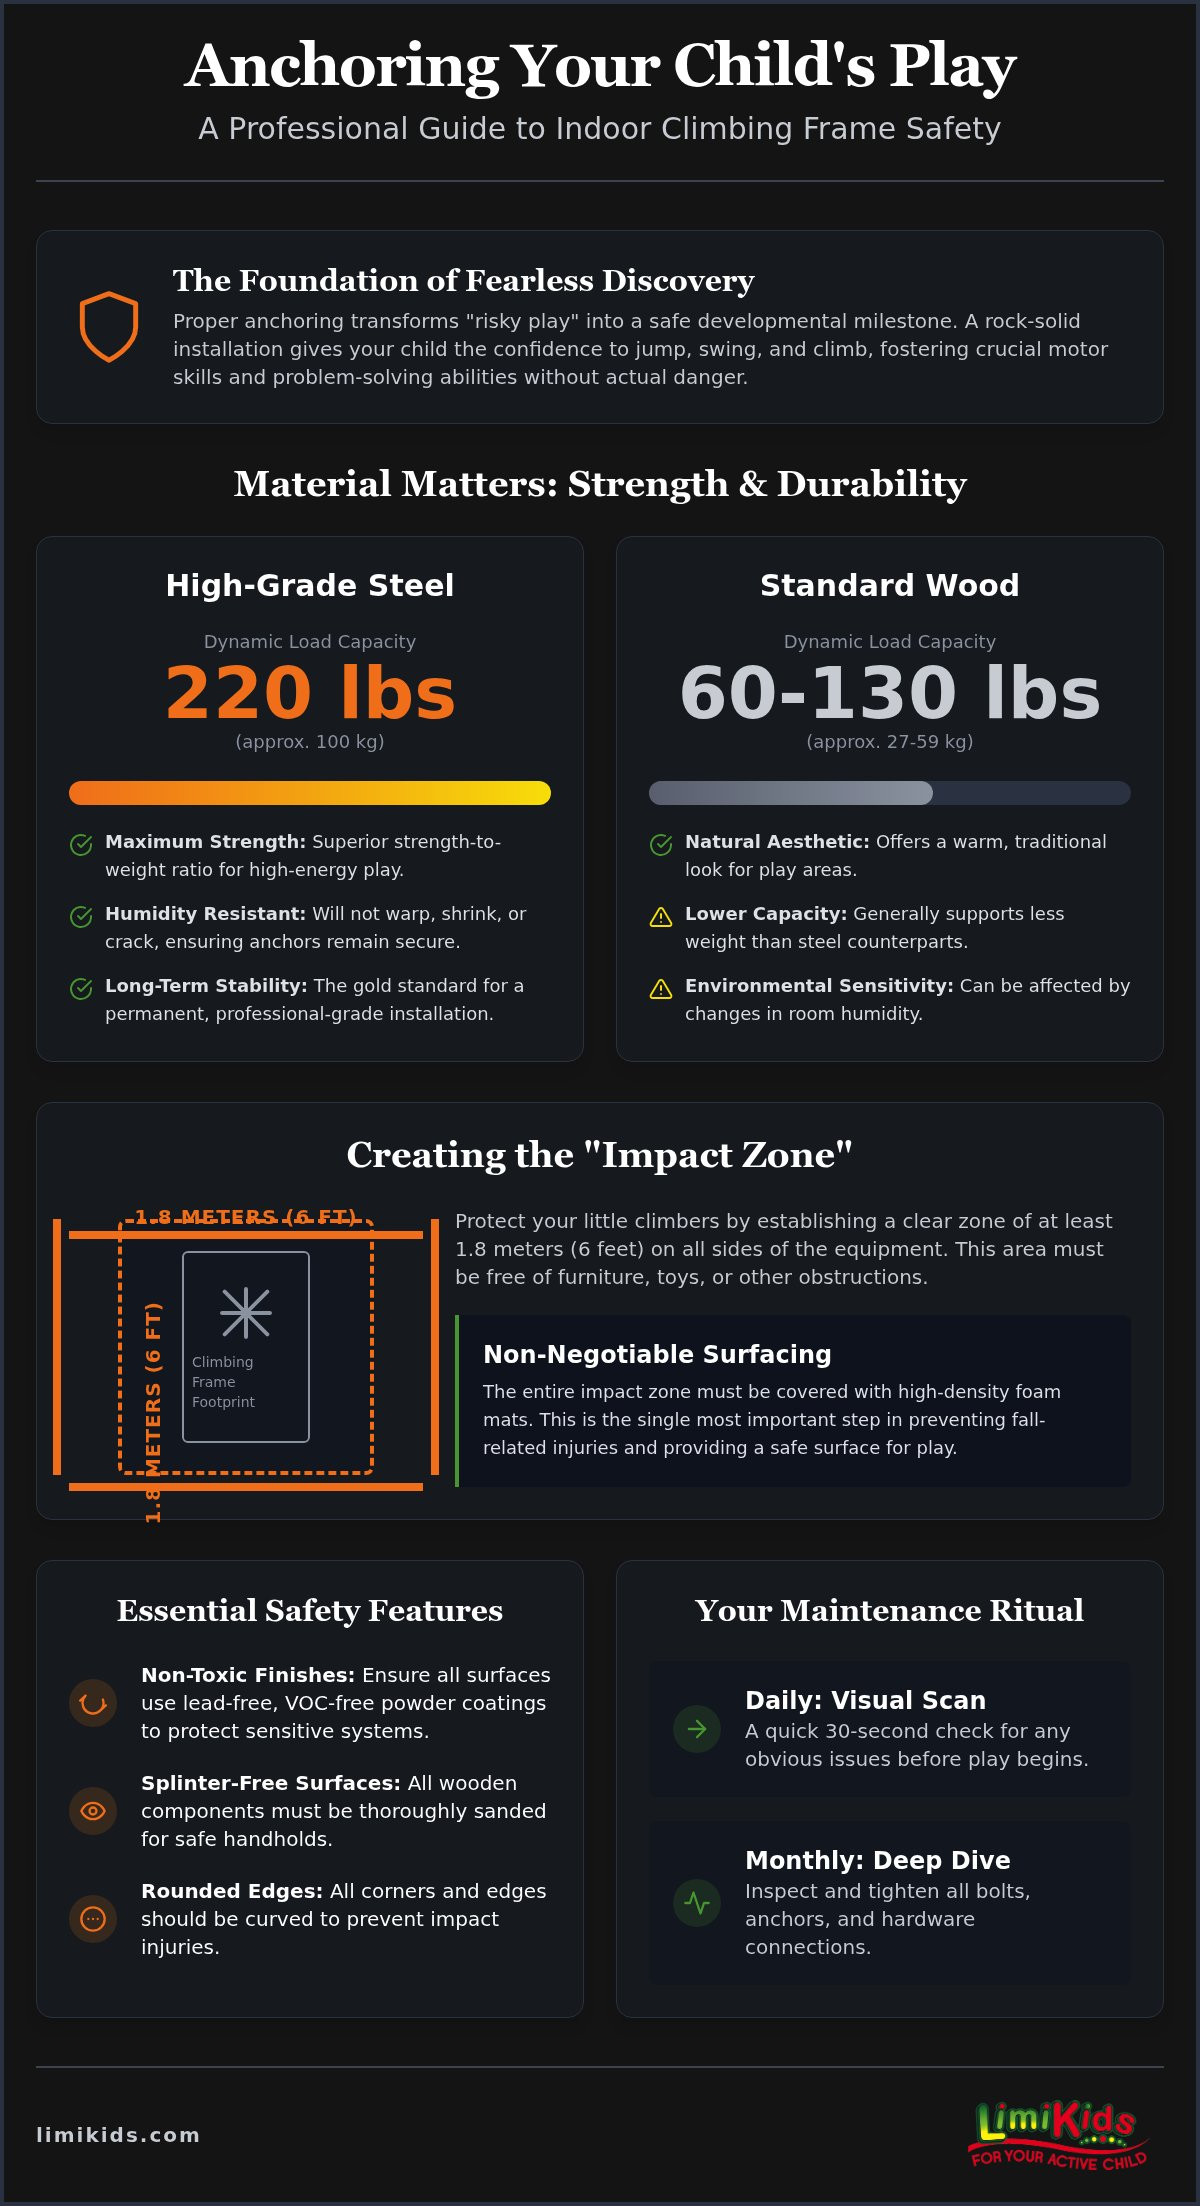
- Protect your little climbers by establishing a 1.8-metre "Impact Zone" equipped with non-negotiable high-density foam mats.
- Maintain a professional-grade play space with a quick daily visual scan and a dedicated monthly deep-dive into hardware integrity.
Why Structural Safety is Your Child’s Best Playmate
Safety isn't just a set of rules; it's the engine of childhood discovery. True indoor jungle gym safety lives at the intersection of structural integrity and age-appropriate design. When you master how to anchor indoor climbing frame systems, you create a space where your child can thrive. This rock-solid foundation fosters "risky play" benefits, such as problem-solving and emotional regulation, without the actual danger of equipment failure. A safe home gym is a system that exceeds weight limits by at least 20%. By removing the fear of a tip-over, you allow your child to focus entirely on their movement. This focus is where the real magic happens for proprioception and gross motor skill development.
The Developmental Connection: Safety Meets Growth
Unshakeable confidence starts with a steady handhold. When a toddler scales a ladder that doesn't budge, they learn to trust their own physical strength. This secure environment is vital for sensory integration, helping the brain process tactile and vestibular input accurately. This sensory clarity actually prevents accidents because the child isn't compensating for a wobbly structure. We believe "safe" doesn't mean "boring." Instead, it means providing challenges that respect physical limits while encouraging big movements. A properly anchored Jungle gym (climbing frame) gives your child the freedom to fail safely and succeed wildly.
Setting the Standard: ASTM vs. Residential Realities
While public parks follow strict ASTM F1487 rules, residential equipment in Canada should meet specific consumer safety standards like ASTM F1918. These guidelines ensure home gyms handle the dynamic load of active play. Residential gyms require different safety parameters than public parks because the equipment often serves multiple purposes in a smaller footprint. You need gear that stands up to constant use without compromising your home's structure. Learning how to anchor indoor climbing frame hardware correctly is how you bridge the gap between simple play equipment and a professional-grade home gym. For a deeper dive into why these spaces are transformative, read our guide on 7 Reasons Your Child Needs an Indoor Home Gym.
Material Integrity: Metal vs. Wood and Non-Toxic Finishes
Choosing the right material is the first step in ensuring a rock-solid installation that lasts for years. Whether you prefer the warmth of sustainable wood or the industrial strength of steel, your choice dictates how to anchor indoor climbing frame hardware effectively. High-quality steel frames often support dynamic loads up to 220 lbs, while wooden alternatives usually cap between 60 and 130 lbs. This weight capacity isn't just a number. It’s the ultimate indicator of structural reliability. When equipment is built to exceed standard weight limits, it provides the stability needed for vigorous play without the risk of material fatigue.
The Case for Metal: Durability and High-Capacity Play
High-grade steel offers an incredible strength-to-weight ratio, making it the gold standard for high-energy play. Metal frames are particularly advantageous in Canadian basements or rooms with varying humidity levels, as they won't warp, shrink, or crack like budget timber. This permanence ensures your wall anchors stay tight and secure, simplifying the process of how to anchor indoor climbing frame equipment for the long haul. If you're debating which material fits your home's aesthetic and activity level, explore our detailed comparison of Wooden vs Metal Indoor Jungle Gym options.
Non-Toxic Standards: Beyond the Surface
Safety goes deeper than the studs in your walls. Since children often explore with their hands and mouths, non-toxic, lead-free powder coatings are essential. Look for VOC-free finishes that protect sensitive sensory systems from off-gassing. According to the CPSC Public Playground Safety Handbook, surfacing and finish integrity are just as critical as the hardware itself. You want a finish that provides enough grip to prevent slips without being abrasive to little hands.
- Splinter-free surfaces: Sanded rungs are a must for any wooden Montessori equipment.
- Rounded edges: Every corner should be curved to prevent impact injuries during fast-paced play.
- Verified certifications: Always check that finishes are water-based and free from heavy metals.
A safe setup starts with premium components that can handle the "dynamic load" of a growing child. If you're ready to build a space that encourages movement, consider the high-capacity indoor jungle gyms designed for maximum durability and peace of mind.
Building a world of indoor discovery requires more than just enthusiasm; it demands a systematic approach to structural integrity. Before your child takes their first swing, you need a clear roadmap for assembly. Learning how to anchor indoor climbing frame equipment properly means looking beyond the box and understanding the very walls of your home. Follow this essential checklist to move from "out of the box" to "ready for action" with total confidence.
- Step 1: Identify your wall type. Determine if you are mounting into drywall with wood studs, solid concrete, or brick.
- Step 2: Verify weight limits. Check the maximum capacity for every single component, including monkey bars and swings, to ensure they meet your child’s needs.
- Step 3: Secure hardware with a torque-check. Tighten bolts until they are firm, but avoid over-tightening, which can strip threads or crush wooden rungs.
- Step 4: Conduct a load test. Apply significant pressure or weight to the structure yourself before allowing your child to climb.
- Step 5: Document the date. Mark your installation date on a calendar to track your monthly maintenance deep-dives.
Mounting Mastery: Securing Your Gym to the Home
Canadian home construction typically relies on 16-inch on-center wood studs. Finding these studs is the most critical part of how to anchor indoor climbing frame systems effectively. If you are using a floor-to-ceiling tension system, ensure the pressure is distributed evenly across a solid joist rather than just the ceiling drywall. Vertical alignment is your best friend here. A frame that is even slightly tilted puts uneven stress on the anchors, which can lead to loosening over time. Use a level during every step of the process to maintain perfect structural balance.
Hardware and Fasteners: The Small Parts that Matter
The smallest details often provide the biggest safety wins. Check that all bolts are recessed or covered with smooth plastic caps to prevent clothing snags during high-speed play. While the CPSC Public Playground Safety Handbook provides excellent benchmarks for public spaces, your home gym needs a personal touch. Use the "Two-Finger Rule" for all ropes and swings. If you can't easily fit two fingers between the hardware and the rope, it might be too tight, causing premature wear. Ensure all caps and covers are snapped into place so no sharp edges or threads remain exposed to curious little hands.
Creating the 'Impact Zone': Surfacing and Clearance Rules
Anchoring your gym is only half the battle for a fearless play space. To truly empower your child's movement, you must define the "Impact Zone." This is the 1.8-metre radius extending in every direction from the active play equipment. It functions as a dedicated safety buffer where obstacles are strictly forbidden. Learning how to anchor indoor climbing frame units is the structural first step, but professional-grade surfacing is the safety finish line. Within this zone, high-density foam mats are non-negotiable. Standard area rugs or thin carpets do not provide the impact attenuation required for climbing heights, making them a risky choice for active zones.
Every centimetre of fall height requires a corresponding level of protection. For structures where children might climb higher than one metre, a mat thickness of at least 5 centimetres (2 inches) of high-density foam is the benchmark. This thickness absorbs the dynamic force of a jump or an accidental tumble, protecting joints and heads alike. Clear the perimeter of all "hard-edge" furniture. Coffee tables, toy bins, and storage units must stay well outside the 1.8-metre boundary to prevent secondary impact injuries during high-energy play sessions.
The Science of the Soft Landing
Not all foam is created equal. While interlocking EVA foam tiles are excellent for low-profile Montessori equipment, higher frames require gymnastic-style crash pads. These surfaces do more than just stop a fall. They provide vital proprioceptive feedback, which is the brain's ability to sense body position and movement. As a child lands on a firm yet forgiving surface, they develop better balance and body awareness. This is a fundamental part of setting up Sensory Motor Equipment for Home, where every landing is a chance to build physical intelligence.
Vertical and Horizontal Clearance: Avoiding the Obstacles
Vertical space is just as critical as floor coverage. Before you finalize how to anchor indoor climbing frame hardware, measure your ceiling height against the top rungs or monkey bars. A child needs enough "headroom" to sit comfortably on the highest bar without risk of collision. Maintain a clear path for brachiation, which is the hand-over-hand swinging movement children love. If the gym is in a shared room, manage the "traffic flow" by ensuring the impact zone doesn't overlap with main walking paths. This prevents accidental collisions between climbers and other family members moving through the house.
Ready to complete your home gym setup with professional protection? Explore our range of high-density safety mats to ensure every landing is a safe one.
Maintenance and Active Supervision: The Parent’s Daily Ritual
Safety is a living ritual. It doesn't end once the last bolt is tightened; it evolves with every climb and jump. To maintain a high-energy play space, you need a proactive maintenance habit that becomes second nature. Start every session with a 60-second "Visual Scan." Ensure your high-density mats are perfectly centered under the frame. Check that no stray toys or hard objects have migrated into the 1.8-metre impact zone. This quick check ensures the environment is ready for the infectious joy of discovery. Active supervision is your next layer of protection. For toddlers tackling new milestones, stay within arm's reach. This isn't about hovering. It's about being an empowering guide as your child tests their physical limits.
The Monthly Integrity Audit
Even the most professional installation needs a regular check-up. Canadian homes experience seasonal shifts in temperature and humidity that can affect how hardware sits in your walls. A monthly deep-dive is essential for long-term security. Re-tightening is a core part of how to anchor indoor climbing frame systems because the vibrations from vigorous play can gradually loosen fasteners over time. You must ensure the frame remains flush against the wall or ceiling without any play or "wiggle."
- Inspect ropes: Look for any signs of fraying or thinning in swing attachments.
- Check metal integrity: Scan for stress marks or any chipping in the non-toxic powder coating.
- Verify anchors: Use a wrench to confirm that wall anchors haven't settled or pulled away from the studs.
- Retire worn parts: If any component shows structural fatigue, replace it immediately to maintain the gym's 20% safety margin.
Empowering Kids: Safety as a Skill
Safety is a skill you teach, not just a rule you enforce. Introduce the "Three Points of Contact" rule as soon as your child begins to scale the rungs. This means having two hands and one foot, or two feet and one hand, firmly on the structure at all times. Coach your child on how to perform a controlled landing, bending the knees to absorb impact. This builds physical intelligence and emotional regulation. By fostering these skills, you transition from a constant spotter to a confident observer. You're giving them the tools to navigate physical challenges independently while maintaining a safety-first mindset. This balance transforms your how to anchor indoor climbing frame project into a true sanctuary for growth and unshakeable confidence.
Transform Your Home Into a Sanctuary of Growth
Securing your child’s play space is the ultimate gift of freedom. By mastering how to anchor indoor climbing frame equipment into your home’s structural studs and maintaining a 1.8-metre impact zone, you remove the invisible barriers to their physical development. You now know that structural integrity starts with premium materials and ends with a consistent maintenance ritual. This solid foundation allows your child to test their limits, build unshakeable confidence, and reach new milestones in a space designed for their success. Since 2008, we've been Canada’s trusted source for active indoor play. Our equipment is designed for the rigours of daily play, and our expert support helps you choose the perfect gear for your unique home.
Don't let safety worries or technical confusion hold back their potential. Build Your Safe Haven: Explore LIMIKIDS Premium Indoor Gyms today. It's time to step back and watch them soar with absolute peace of mind!
Frequently Asked Questions
How often should I tighten the bolts on an indoor jungle gym?
Perform a monthly deep-dive to check all hardware and re-tighten bolts. Vigorous play creates vibrations that can gradually loosen fasteners over time. A quick 60-second visual scan every day before play begins is also essential to ensure nothing has shifted. This routine is a vital part of how to anchor indoor climbing frame systems for long-term reliability. Don't over-tighten, as this can damage wooden rungs or strip metal threads.
What is the best flooring for an indoor climbing frame in a small room?
High-density foam mats are the best choice for small rooms because they provide maximum impact absorption in a compact footprint. Ensure your mat is at least 5 centimetres thick if your equipment allows for significant climbing heights. Unlike standard area rugs, these professional-grade mats are designed to attenuate the force of a fall. They also provide the necessary proprioceptive feedback for developing motor skills during every landing.
Are indoor jungle gyms safe for toddlers under three years old?
Yes, indoor jungle gyms are safe for toddlers under three when you use age-appropriate equipment and maintain active supervision. Montessori-inspired structures are specifically designed for early motor development and sensory processing. Always stay within arm's reach of your toddler as they explore new milestones. Ensure the equipment meets entrapment safety standards, meaning gaps are either smaller than 3.5 inches or larger than 9 inches to prevent head injuries.
Can I install a Swedish wall gym on a drywall-only wall?
You should never install a climbing frame into drywall alone; you must secure it directly into wood studs or solid masonry. Drywall cannot support the dynamic load of a child swinging or jumping. Use a stud finder to locate the 16-inch on-center wood studs common in Canadian homes. If you are unsure how to anchor indoor climbing frame hardware into your specific wall, always prioritize hitting the structural framing for absolute security.
What is the maximum weight limit for a typical home jungle gym?
A high-quality steel home gym can typically support a dynamic load of up to 220 lbs. Wooden climbers usually have a lower capacity, often ranging between 60 and 130 lbs. It's vital to choose equipment that exceeds your child's current weight by at least 20% to account for the force of active movement. Always verify the individual weight limits for every component, from the monkey bars to the swings, before play begins.
How do I prevent my child from climbing too high on the gym?
Active supervision is the most effective way to manage climbing height, but you can also use physical boundaries. Consider removing the top rungs or high-access accessories until your child develops the necessary coordination and self-regulation skills. Teach them the "Safety Rules of the Gym" early on, focusing on the three points of contact rule. This empowers them to explore within their current physical abilities while you stay close for support.
Are wooden jungle gyms safer than metal ones for indoor use?
Neither material is inherently "safer," but metal often provides superior structural reliability and higher weight capacity. Steel frames won't warp or crack due to humidity changes in Canadian basements, which keeps the anchors more secure over time. Wood offers a natural aesthetic and is popular for Montessori setups, but it requires more frequent checks for splinters or material fatigue. Your choice should depend on your child's activity level.
What should I do if I notice a small crack or fray in the equipment?
You must retire the component or stop play immediately if you notice any structural damage like cracks or fraying ropes. Small cracks in wood or stress marks in metal can lead to equipment failure under a dynamic load. Since safety is a system that requires 100% integrity, replacing worn parts is non-negotiable. Regular monthly audits help you catch these issues early before they become a hazard during high-energy play sessions.